


There is a great diversity of approaches to continuous integration and continuous delivery (CI/CD). Containerizing apps with Docker is a common step to take, for a variety of reasons. Once containerized, a key element to the CI pipeline is to build an image upon check-in, run the tests, and then publish the image to Docker Hub (or another registry) for use by downstream steps.
This article focuses on how to set up Jenkins to pull updated application code from GitHub, build a Docker image, run the tests, and publish it to the registry.
You’ll use a simple Java app for this purpose, but the process is pretty similar across different stacks.
Publish to Docker Hub
This tutorial does a good job of introducing the basics of Java, Jenkins, and Docker. We are going to take it a step further here and describe how to pull the latest GitHub check-in, build a Docker image of the app, and publish it to Docker Hub if successful. You’ll need a Docker Hub account, which is free.
Publishing to a central container image repo (in this case, Docker Hub) is a key element to enterprise CI/CD, because it provides a common location for reuse of the artifact at various stages, from QA and test to production.
Spin up Jenkins and Docker-in-Docker
To set up Jenkins with the capability of running Docker, we’ll run two Docker images in a VM. One container will host “Docker-in-Docker” (the docker:dind image) for accessing Docker itself and the other will host Jenkins. The two containers will interact via network and volumes. This is the method advocated by the Jenkins docs.
First, create a new VM in your cloud provider of choice. I’ll be using Google Cloud Platform (GCP).
An excellent way to jumpstart this architecture is to start with a VM that already has Docker and the Docker-in-Docker image installed. In the GCP console, I access the Compute Engine and click Create New Instance. I’m using a fairly beefy N1-Medium instance because both Docker and Jenkins are hefty installs.
The trick is to select Install Image. For the image name, use docker:dind. This will ensure the Docker CLI is avaiable. Also, expose port 8080 to external traffic, as Jenkins will be listening on that port.
Once your VM is up, make sure Docker is running by typing docker --version.
Now you’re going to create the Docker network bridge that the Jenkins and Docker-in-Docker containers will share. Execute docker network create jenkins.
Set up Docker-in-Docker
The VM is already running the docker:dind image, but we want to customize it. So type docker container list, find the (first few characters of the) UID for the container and stop it with docker stop. For fine-grained details on these configurations, check the docs.
Now start the Docker-in-Docker container back up with the command in Listing 1.
Listing 1. Run docker:dind
docker run --name jenkins-docker --rm --detach --privileged --network jenkins --network-alias docker --env DOCKER_TLS_CERTDIR="" --volume jenkins-docker-certs:/certs/client --volume jenkins-data:/var/jenkins_home --publish 2735:2375 --publish 2376:2376 docker:dind --storage-driver overlay2
Listing 1 starts up the docker image while listening on port 2375, and participating in the Jenkins network you created earlier. Note that 2375 is the non-SSL port; your security requirements may necessitate listening on 2376 and providing appropriate keys.
Run the Jenkins container
Now we’ll run an instance of the official Jenkins image, also participating in the network bridge. Run the command in Listing 3.
Listing 3. Running the Jenkins image in a container
sudo docker run --name my-jenkins --detach --network jenkins --env DOCKER_HOST=tcp://docker:2375 --volume /home/matthewcarltyson/jenkins:/var/jenkins --volume /usr/bin/docker:/user/bin/docker --publish 8080:8080 --publish 50000:50000 --user root jenkins/jenkins:lt
Now Jenkins is running with access to Docker. You should be able to hit your running VM at :8080. Note that several of the flags on this command are optional — in particular, listening on 50000 is only required if you are going to have Jenkins agent instances calling into this instance as “master.”
Jenkins system password
Jenkins outputs a password to its logs. The web page will ask for it. Go to the VM command line and type docker container list to obtain your UID for the “jenkins” instance, and type docker logs --tail 50 to obtain your admin password.
Now enter the admin password into the web app form.
Configure Jenkins
Go ahead and click Install Suggested Plugins. Next you’ll be asked to create an admin user. Do that. Also accept the default IP address and restart the server to load the plug-ins when prompted.
Add the Docker plug-in
There are several Docker plug-ins available. We’ll use the one imaginatively named “Docker plugin,” which gives you a lot of power with minimum configuration. For more detailed control, you might consider the docker-build-step plug-in, or switching to a pipeline build.
Go to Manage Jenkins -> Plugins -> Available and type “docker” into the field. Select “Docker plugin” and install it.
Jenkins refers to the Docker plugin as a “cloud.” Click Manage Jenkins once again, and now click the Manage Clouds and Nodes button in the middle. Now click Configure Clouds on the left.
This will allow you to access the bridge network you created earlier and connect to the container running Docker.
For the name, use something you’ll recognize like “Docker.” Click Docker Cloud Details to expose the Docker Host URI field, and enter “tcp://docker:2375” there.
Save it and return to the Jenkins dashboard.
Set up the Jenkins project
Now we’ll set up a Jenkins project that will use two build steps — one that pulls the latest code from a Git repo and builds the app, and one that builds the image and pushes it up to Docker Hub. This is intentionally very simple; in a real-world situation, the app might be built inside the Dockerfile, or another “infrastructure as code” (IaC) tool.
Click New Item in the main menu and select Freestyle Project. Give it a name you like.
In the project details, scroll to the Build section, select Execute Shell Script, and insert the contents of Listing 4.
Listing 4. Shell script to download and build simple-java
#!/bin/sh

REPOSRC=https://github.com/MTyson/simple-java.git
LOCALREPO=idg-java-docker

# We do it this way so that we can abstract if from just git later on
LOCALREPO_VC_DIR=$LOCALREPO/.git

if [ ! -d $LOCALREPO_VC_DIR ]
then
    git clone $REPOSRC $LOCALREPO
else
    cd $LOCALREPO
    git pull $REPOSRC
fi

chmod 777 mvnw

./mvnw clean package

# End
The script in Listing 4 will check out or pull the latest source code for the Java project found at https://github.com/MTyson/simple-java.git. This is just a simple “Hello world” Spring Boot app. Once it has the latest, the script modifies permission on the Maven command (in real-world use, 777 is too permissive), and then executes the Maven build.
Use the Docker plug-in to build and publish the image
Now add a build step after the shell script and select Build/Publish Docker Image. In the Directory for Dockerfile field, type “./idg-java-docker.” This corrosponds to the repo name you used in the previous step.
In the Cloud field, select the “Docker” cloud you created earlier.
Select the Push Image checkbox.
In the Image field, you’ll want to put the name of the user or organization at Docker Hub (in my case, matttyson) followed by a slash and the image name, which is “simple-java.” So the form is username/simple-java. In my case, matttyson/simple-java.
Now select Registry Credentials. In a real project, you would definitely want to use a secret token (creatable at Docker.io) but we’ll keep it simple here and use your user name and password from Docker Hub. Under Credentials, click Add. Leave scope as Global and use Username with Password. Now simply add your user name and password that you use to log into the Docker web app.
After accepting the new credential, make sure it is set as the user on the build step we are configuring. Now save the build.
Run the build
Now click your project’s name at the top to return to its overview, then click the Build Now button on the left.
After a moment, you’ll see the build appear in the list at the bottom-left. Click it and select Console Output on the left to watch the progress of the logs as the build proceeds.
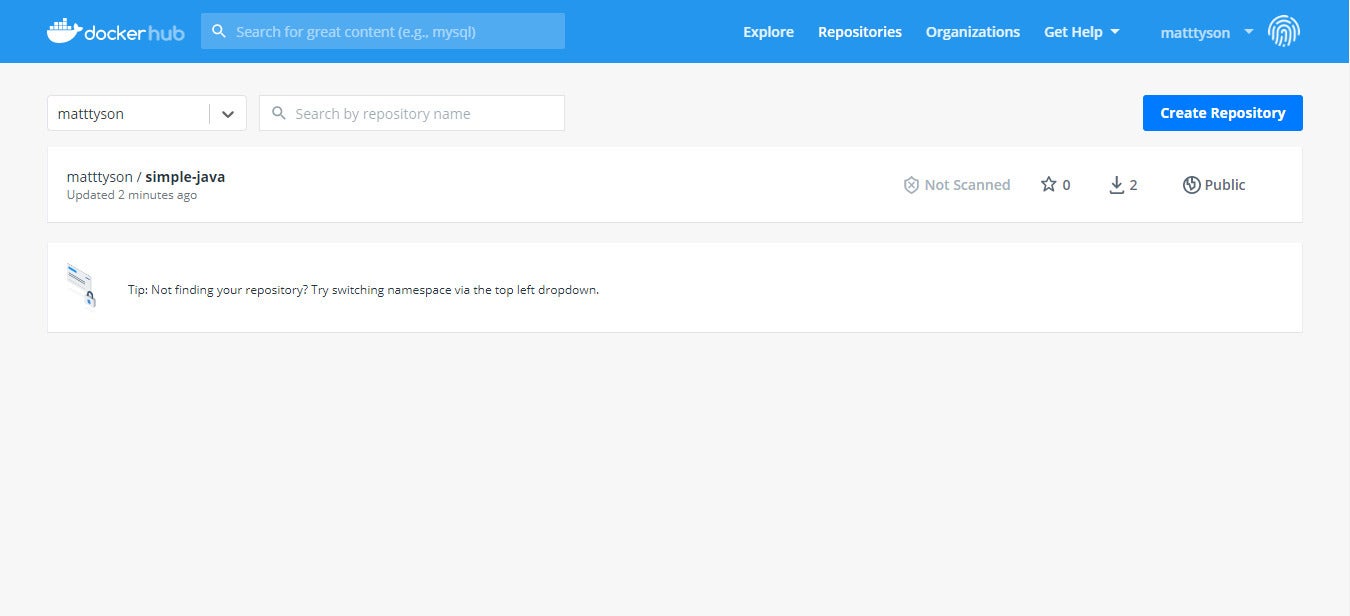
When the build completes, you can navigate via browser to your list of repositories in Docker Hub to see your freshly baked new image, as in Figure 1.
Figure 1. The new image at Docker Hub
 IDG
IDGGit to the registry
Devops is a vast and complex area. This article gives you the tools for handling one critical element: taking a raw app from version control, and turning it into an image available on the Docker Hub registry.