


Logging is an essential feature for any application, as it is necessary for detecting, investigating, and debugging issues. Serilog is a third-party, open source library that allows .NET developers to log structured data to the console, to files, and to several other kinds of data stores. You can learn more about Serilog from my earlier post here.
This article discusses how we can use Serilog to log structured data to a SQL Server database. To work with the code examples provided in this article, you should have Visual Studio 2019 installed in your system. If you don’t already have a copy, you can download Visual Studio 2019 here.
Create an ASP.NET Core 3.0 API project
First off, let’s create an ASP.NET Core project in Visual Studio. Assuming Visual Studio 2019 is installed in your system, follow the steps outlined below to create a new ASP.NET Core project in Visual Studio.
- Launch the Visual Studio IDE.
- Click on “Create new project.”
- In the “Create new project” window, select “ASP.Net Core Web Application” from the list of templates displayed.
- Click Next.
- In the “Configure your new project” window shown next, specify the name and location for the new project.
- Click Create.
- In the “Create New ASP.Net Core Web Application” window, select .NET Core as the runtime and ASP.NET Core 2.2 (or later) from the drop-down list at the top. I’ll be using ASP.NET Core 3.0 here.
- Select “API” as the project template to create a new ASP.NET Core API application.
- Ensure that the check boxes “Enable Docker Support” and “Configure for HTTPS” are unchecked as we won’t be using those features here.
- Ensure that Authentication is set as “No Authentication” as we won’t be using authentication either.
- Click Create.
This will create a new ASP.NET Core API project in Visual Studio. Select the Controllers solution folder in the Solution Explorer window and click “Add -> Controller…” to create a new controller named DefaultController. We’ll use this project in the subsequent sections of this article.
Install the NuGet packages for Serilog
To work with Serilog, you should install the Serilog packages from NuGet. You can do this either via the NuGet package manager inside the Visual Studio 2019 IDE, or by executing the following commands at the NuGet package manager console:
Install-Package Serilog
Install-Package Serilog.AspNetCore
Install-Package Serilog.Sinks.MSSqlServer
Install-Package Serilog.Settings.Configuration
Initialize Serilog in Program.cs in ASP.NET Core
The following code snippet illustrates how you can plug Serilog into ASP.NET Core. Note how the UseSerilog() extension method has been used to set Serilog as the logging provider.
public static IWebHost BuildWebHost(string[] args) =>
            WebHost.CreateDefaultBuilder(args)
                   .UseStartup<Startup>()
                   .UseSerilog()
                   .Build();
Build an example web host in ASP.NET Core
Naturally, we’ll need an application to illustrate the use of Serilog. Here is the complete source code of the Program class for our example app. Note how we’ve configured and built the web host.
    public class Program
    {
        public static void Main(string[] args)
        {
            IConfigurationRoot configuration = new
            ConfigurationBuilder().AddJsonFile("appsettings.json",
            optional: false, reloadOnChange: true).Build();
            Log.Logger = new LoggerConfiguration().ReadFrom.Configuration
            (configuration).CreateLogger();
            BuildWebHost(args).Run();
        }
        public static IWebHost BuildWebHost(string[] args) =>
            WebHost.CreateDefaultBuilder(args)
                .UseStartup<Startup>()
                .UseSerilog()
                .Build();
    }
Remember to include the Serilog namespace in your program as shown below:
using Serilog;
Configure database connection settings in ASP.NET Core
When you create a new ASP.NET Core project in Visual Studio, the appsettings.json file is created by default. Here is where you can specify the database connection string and other configuration information. Open the appsettings.json file from the project we created earlier and enter the following information:
{
  "Serilog": {
    "MinimumLevel": "Information",
    "WriteTo": [
      {
        "Name": "MSSqlServer",
        "Args": {
          "connectionString": "Data Source=LAPTOP-ULJMOJQ5;Initial
           Catalog=Research;
     User Id=joydip; Password=sa123#;",
          "tableName": "Log",
          "autoCreateSqlTable": true
        }
      }
    ]
  }
}
Create a database table to log data in SQL Server
You might want to create the log table yourself as well. Below is the script you can use to create a log table in the SQL Server database.
CREATE TABLE [Log] (
   [Id] int IDENTITY(1,1) NOT NULL,
   [Message] nvarchar(max) NULL,
   [MessageTemplate] nvarchar(max) NULL,
   [Level] nvarchar(max) NULL,
   [TimeStamp] datetimeoffset(7) NOT NULL,
   [Exception] nvarchar(max) NULL,
   [Properties] nvarchar(max) NULL
   CONSTRAINT [PK_Log]
     PRIMARY KEY CLUSTERED ([Id] ASC)
)
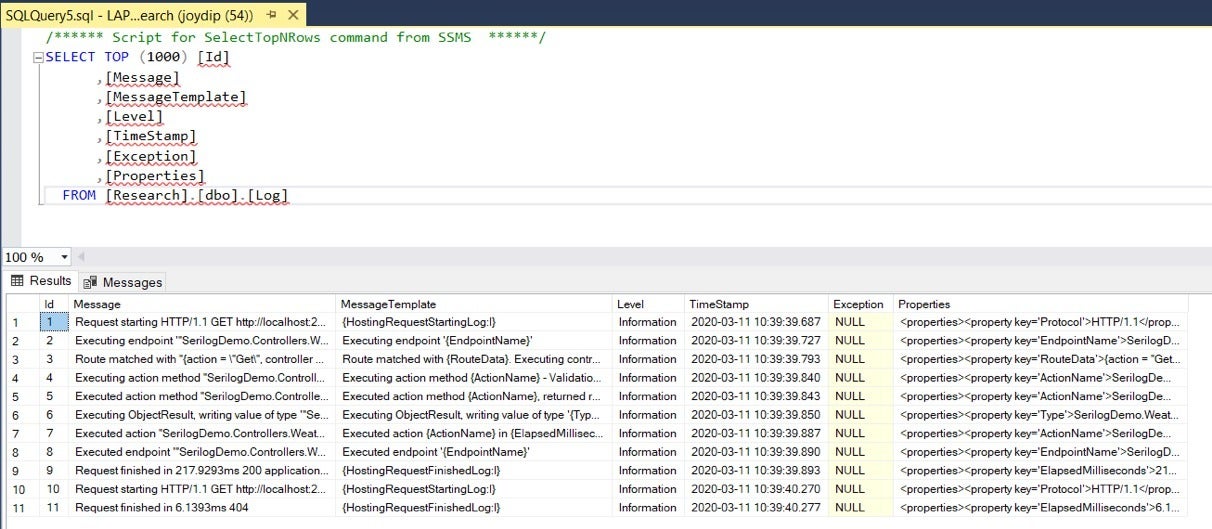
When you run the application, a new table named Log will be created and the ASP.NET Core startup events will be logged there. Figure 1 below shows the data that has been logged inside the Log table.
 IDG
IDG
Figure 1: Serilog in action!
Log data in action methods in ASP.NET Core
You can leverage dependency injection to inject a logger instance in your controller as shown in the code snippet below:
public class DefaultController : Controller
{
   private readonly ILogger<DefaultController> _logger;
   public DefaultController(ILogger<DefaultController> logger)
   {
      _logger = logger;
   }
}
The following code snippet illustrates how you can take advantage of Serilog in your controller’s action methods to log data.
public class DefaultController : Controller
    {
        private readonly ILogger<DefaultController> _logger;
        public DefaultController(ILogger<DefaultController> logger)
        {
            _logger = logger;
        }
        public IActionResult Index()
        {
            _logger.LogInformation("Hello World");
            return View();
        }
    }
Although independent of .NET Core, Serilog plugs into the ASP.NET Core ecosystem nicely, making structured logging easy and convenient. Serilog also takes advantage of dozens of sinks to send the logs to many different logging targets ranging from text files to databases to AWS, Azure, and Google Cloud services. In this post, I’ve demonstrated how we can work with the Microsoft SQL Server sink. I’ll discuss other advanced features of Serilog in a future post here.